5 Types of Roof Ventilation

If your home feels like an oven in the summer, your attic may be causing your air conditioner to work overtime. Roof Ventilation Perth allows heat to escape, reducing the load on your air conditioning system and increasing energy efficiency.

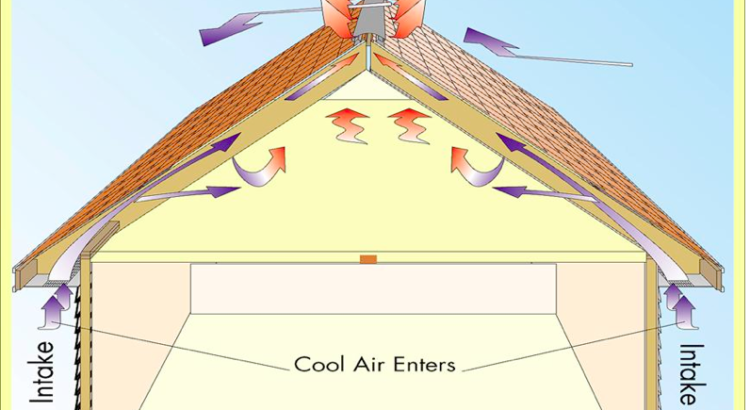
Cool, fresh air enters the attic space through intake-style vents located low on the roof in soffits or near eaves. These vents help push hot air out through the roof’s ridge line exhaust vents.

Roof Ventilation

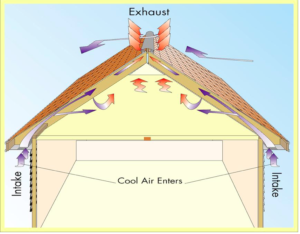
The physics behind roof ventilation is pretty simple. The idea is that hot air rises, and the natural wind that blows will force this air out of vents located at the top of the roof. In order for the system to work correctly though, it’s important to have intake vents that will allow cooler air to flow into the attic and help push this hot air out of the exhaust vents.

These vents are typically located along the eaves and soffits of the home, or in some cases at the lowest part of the roof assembly. They are often covered with the same roofing material as the rest of the roof to blend in with the home’s aesthetic. They are also sometimes called ridge vents.

Intake vents must provide a minimum of as much surface area as the combined areas of all of the attic’s ventilation holes. If there isn’t enough space for this to happen, extreme heat buildup in the summer and severe weather infiltration and moisture problems during winter will occur.

Depending on the type of home and its layout, it may not be possible or practical to provide enough space for intake vents, or it might be necessary to use a gable style vent in addition to an intake vent. These are mostly used on gable style homes or for a portion of the attic overhanging a dormer or other feature that won’t allow for a traditional eave mounted intake.

Another common type of roof vent is a smart soffit vent or vented soffit. These are installed in the soffit at the underside of the attic and can be either visible (with holes) or hidden (with no holes). These work great for homes where the eaves are exposed to the outside but would otherwise interfere with gable vents.

Paired hand-in-hand with intake vents, exhaust vents are a necessary part of any roof ventilation system. They help transfer warm air and moisture outside to prevent mold, mildew, and ice dams. They are also a vital component in preventing heat loss through the roof by keeping air flowing properly and maintaining a more comfortable temperature throughout the house.

Makeup air units (or MAUs) are the other component of a balanced ventilation system. They replace the exhausted air with conditioned ambient air, creating a steady flow of air and helping to maintain stable interior building pressure. MAUs can be found in bathrooms, kitchens, laundry rooms, or in ceiling-mounted exhaust fans for other uses like an art room.

The best exhaust vents will be insulated and will go from the attic space straight out through the roof. This is because they need to be separated from the attic space so that warm attic air does not mix with cold ductwork in a house or the attic itself, leading to condensation.

Exhaust vents can be installed at any point along a roof’s low points, though they are most often found near soffits and attic rafters. A combination of intake vents at lower attic areas and exhaust vents at higher points takes advantage of natural convection, which moves hot air out of attics more quickly.

When choosing an exhaust vent, look for ones that are ‘HVI-Certified’ and have a high performance rating. This means they have been independently tested and verified to meet both ventilation expectations as well as residential and commercial building codes. This provides a level of quality and safety that other products on the market cannot match.

Box vents, also known as turtle vents or louver vents, are a common type of roof exhaust ventilation. They have a distinctive, box-like appearance and are located near the peak of roofs. They operate independently, allowing hot air and moisture to escape from the attic without being pulled in by an intake vent. Box vents can be grouped together and installed in clusters on the roof to increase ventilation capacity. They can be made of a variety of materials, including aluminum, galvanized steel, and plastic.

These types of vents are typically considered an affordable option, though they do not function as effectively as ridge vents. Their effectiveness depends on the size of an attic and its roof slope, as well as local building codes. While ridge vents may cost more than box vents, they provide better long-term attic ventilation and can help avoid costly problems like ice dams and mold.

The main advantage of ridge vents is their ability to effectively remove heat and moisture from an attic by creating a vacuum through continuous evaporation. While they may be more expensive than box vents, the additional cost is often offset by reduced energy costs and maintenance costs over time.

When installing roof ventilation, it is important to use one type of vent and not combine multiple types. Mixing different types can disrupt the natural flow of air and cause inefficient ventilation. This can result in a number of problems, including insufficient moisture removal and heating and cooling inefficiencies. It is best to consult a roofing professional for tailored advice on which type of ventilation system is the most suitable for your home.

Choosing the right roof ventilation system is an important part of maintaining your home and maximizing its lifespan. It will prevent issues like ice dams, excessive moisture, and high heating and cooling costs.

Often called “power vents,” hard-wired or solar-powered attic vents use an electric fan to push hot air out of the attic, reducing mildew and increasing energy efficiency. Because they rely on an electrical power source, however, they can increase your electricity bill.

Intake vents pull cool air into your home, lowering the overall temperature of your house and decreasing your energy costs. As a result, your air conditioning doesn’t have to work as hard to cool your home, which can also help prolong the life of your roof and reduce maintenance costs.

Humid air can cause mold, rot and other roofing problems, but a well-ventilated attic can prevent these issues by allowing humid air to escape. This dries out the attic, and the resulting dry air can lower your energy bills and reduce moisture in your home.

Some roof vents work as both intake and exhaust vents, while others are dedicated to one or the other. The most popular types of intake and exhaust vents include ridge vents, gable vents, box vents and roof turbines.

Ridge vents are installed along the ridge line of your roof when it’s being built or replaced, and they exhaust the hottest air in your attic space. Soffit vents install along the underside of your eaves to allow fresh air into your attic, and they work in tandem with ridge vents to maintain continuous ventilation.

Box vents, which look like small boxes on your roof, have a screened opening that allows air to move in and out. This type of vent is useful because it can be placed in small areas that can’t accommodate ridge vents. Additionally, you can use multiple box vents throughout your roof for maximum efficiency.

Cupolas are an attractive way to add architectural flair to a roof. They come in a wide variety of shapes and sizes, so you can choose one that complements your home’s architectural style. The shape of the cupola and its size also have an impact on ventilation. Smaller cupolas won’t be as effective in letting hot air escape, but they can still offer better ventilation than a flat roof without a vent. A larger cupola will have more of a dramatic impact, but it will also be heavier and more difficult to install on the roof.

Most cupolas have louvers or open windows to promote ventilation. The slats on the louvers are angled to allow air to pass through while keeping rain and direct sunlight out. You can find cupolas with glass panes to let in light and air or you can get ones with wooden louvers, which have a more traditional look.

Because warm air rises, a cupola can be an efficient roof vent in a barn or other structure with a ridge-top space. The louvers or open windows can provide an exit for the warm air and help pull cool, fresh air in from eave vents or doorways below. The rounded, multi-sided shape of a cupola is also ideal for a barn because it allows a constant flow of air into the hayloft, helping to dry and ventilate the hay.

You can also use a cupola to enhance the appearance of your pole barn or garage. The decorative details can bring an extra bit of charm to the building and give it a finished look. You may also want to consider adding a weathervane designed to reflect your passion for horses.

The Importance of Gutter Cleaning

Pro Gutter Cleaning Charleston removes leaves, twigs, dirt, and debris from your gutter system. Gutter professionals use a variety of tools and procedures to clean your gutters efficiently.

Gutter Cleaning

Gutter Cleaning is dangerous and can lead to serious injuries if not done properly. It’s best left to professionals.

Gutter cleaning is not one of the most fun home maintenance tasks, but it is important to keep up with because it can help protect your house from a variety of expensive problems. Gutters are designed to channel rainwater away from your home’s foundation, but clogged gutters can cause damage in many different ways.

Clogged gutters can force water from the roof into areas of the home where it’s not supposed to go, such as the basement. This can lead to flooding, mold, and other issues that are costly to repair.

In addition to basement floods, clogged gutters can cause water leaks. When rainwater can’t flow down the gutters, it will find another way to leave your home. This can result in water leaking through the roof, causing ceiling damage and wall staining. It can also leak through the walls and into the insulation in your attic, causing mold and other water damage.

Water damaged wood can rot, and wet sheet rock can crumble and fall apart. These issues are costly to fix and can pose a health risk for your family.

The main job of a gutter is to channel rain and snow away from the foundation of your home. Clogged gutters can cause erosion and damage to the soil around your house, which can weaken its foundation over time, resulting in cracks and shifting of the structure. This can also lead to a basement that’s always wet and musty, which is costly to repair.

In addition to these serious issues, a clogged gutter can also attract unwanted pests to your home. Standing water is a favorite hangout for mosquitoes and other insects that can carry diseases and make your family miserable. Insect infestations can also lead to expensive and time-consuming pest control and re-infestation efforts. Keeping your gutters clean prevents the growth of these annoying pests and can help save you money on pest control services.

Clogged Gutters Lead to Pest Infestation

If a gutter is clogged, it can become the perfect breeding ground for unwanted pests. Cockroaches, ants, and other bugs love the moist environment that a clogged gutter creates; they also have easy access to your home through the eaves. Standing water in your gutter can also breed mosquitoes, flies, and other pesky insects that can sting or carry diseases that can infect you, your family, or your pets.

Clogged gutters can also create rodent nests, and a rodent infestation can lead to severe damage to your home. Rodents can chew through wires and insulation in your attic or walls, and if they reach the interior of your home, they will cause water leaks, mold, and other damage. Clogged gutters can also attract squirrels, raccoons, birds, and other pests that can be a nuisance to your home.

The moisture that accumulates in a clogged gutter can also attract stinging pests such as wasps and bees, which may build hives in the gutters. If the hives get too large, they can also sting people or animals that pass by. Clogged gutters can also attract hornets, which can swarm homes and attack humans.

Snakes can also be a problem in clogged gutters, and they are more likely to enter a home if the gutters are filled with debris. Snakes are adept climbers, and they can use the clogged gutter as an avenue to the roof of the house where they can cause damage.

Gutter cleaning services can help you get your gutters back in working order and protect your home from potential damages. Gutter cleaning involves removing debris from your gutters, including leaves, twigs, and other organic materials. It also includes flushing out the gutters with a garden hose to remove any excess moisture. Gutter cleaning services can be performed by a professional with a ladder or power washing equipment and can include a full inspection of your gutters.

Gutter cleaning is a routine maintenance that helps keep your house in good condition. Keeping your gutters clean can prevent costly repairs and improve the appearance of your home’s exterior.

Clogged Gutters Lead to Mold and Mildew

Gutters are designed to quickly move rainwater away from the building’s structure, and if they become clogged this is not only an unsightly mess but can cause serious damage to your home. This is because, when water is trapped and not drained correctly, it can seep down walls and into the building itself, damaging insulation, windows, and even ceilings. It can also create the perfect breeding ground for mold and mildew, which can cause serious health problems in those with respiratory conditions.

As the damp conditions of a clogged gutter allow for the growth of harmful fungi, these organisms will start to spread throughout your home, producing unsightly stains and potentially toxic fumes that can cause breathing difficulties in those with asthma or other respiratory issues. This is particularly problematic when the fungi are allowed to thrive in damp areas such as the attic, where they can then travel through openings and holes to the rest of the house and cause damage.

In addition to causing damage to the interior of your home, clogged gutters can also affect the foundation of your property. This is because the role of your gutters is to deflect rainwater and melted snow away from the base of your home, protecting it from water damage and floods that can lead to cracking or shifting of the foundation itself. Leaving your gutters clogged can allow water to pool around the foundation, weakening it over time and leading to further damage as it seeps into existing cracks or creates its own.

Keeping your gutters free flowing is an easy and affordable way to protect your home from costly repairs. Ideally, you should hire a professional service to clean your gutters regularly, as they have the knowledge and experience working on ladders that can be hazardous for those who are not accustomed to it. They can also fix any damage to your gutters, ensuring that they are in good working order and are ready to do their job properly. In addition, they can also carry out a complete roof inspection to ensure that there are no underlying issues that need to be addressed.

Clogged Gutters Lead to Roof Damage

Gutters are designed to protect the roof and the structure of your home from damage caused by rainwater. But they can’t do their job properly if the gutters themselves are clogged. A clogged gutter means the water can’t be diverted away from your roof, which can cause all sorts of problems. This includes rotted wood, cracked sheetrock and water leaks that can lead to expensive repairs.

Clogged gutters also create a breeding ground for weeds, mold and mildew, which can stain the exterior of your house and deteriorate the appearance of roofing shingles. It’s important to clean the gutters and downspouts regularly to prevent these problems.

Another reason why gutters need to be cleaned is that they can get weighed down by debris and fill with standing water. When this happens, the gutters may begin to sag or even fall off of the fascia board. This can be dangerous and needs to be fixed as soon as possible.

Clogged gutters allow water to build up on the roof and saturate the insulation. This can cause a lot of damage in a short amount of time and lead to a lot of problems, including mold, mildew and rotting wood. It can also lead to leaking ceilings and water spots on walls inside your home.

Gutters that are clogged can also lead to leaks and floods around the foundation of your home. When rainwater can’t escape your gutters, it can soak the soil around your foundation, which will weaken the foundation over time. This can lead to cracks or even collapse your foundation.

Clogged gutters can also be dangerous to clean yourself. You should always hire a professional with proper equipment and safety training to clean your gutters. Ladders should be used with caution, and you should never attempt to reach the gutter from the roof. It’s a very dangerous task that can result in serious injury. There are special attachments for pressure washers that can help you clean the gutters, downspouts and drains safely from the ground.

Important Factors To Consider When It Comes To Air Conditioning Installation

Air conditioning installation involves a variety of factors. It includes ductwork and other specialized equipment and may require an upgrade to your electrical service panel.

A professional All Temp Air Conditioning & Refrigeration team will make sure all components fit and function according to manufacturer specifications. This prevents future problems and helps the equipment run as efficiently as possible.

air conditioning installation

Size

Whether you’re replacing an old system or installing a new one, the size of the unit is an important factor to consider. This is especially true if you have an existing system that has been in place for a while. In many cases, the manufacturer will have a sticker on the outdoor compressor that contains all of the information you need to know about what size unit is currently in place. If you don’t have an existing system, there are a few general rules of thumb that can help guide your decision.

First, it’s important to determine what type of air conditioning installation you want. Air conditioners are rated for both their energy efficiency and cooling capacity, so it’s important to choose the right size to match your needs. Energy efficiency is represented by a SEER rating while cooling capacity is measured in BTUs per hour (BTU/H).

To determine what size AC unit you need, start by calculating the square footage of the room or rooms you’re trying to cool. To do this, simply multiply the length times the width of each room. Next, divide the result by 25 to get the number of BTUs needed to cool the space. A single-ton AC unit will provide enough cooling power to cool 2,000 square feet.

You’ll need to take into account a few other factors when determining the size of an air conditioning installation. For example, does the space have a lot of windows? How many people will regularly occupy the room? Does the space have a ceiling fan or other ventilation systems? All of these factors can affect the BTU/H required to keep the space comfortable.

Finally, you’ll need to take into account the climate where you live. In some cities, a 2,000-square-foot home will require more BTUs to cool than a similar home in a cooler state.

Although there are a few sizing “rules of thumb” that can help you narrow down your options, it’s always best to have a qualified technician complete a Manual J calculation to ensure you receive the correct air conditioning installation.

Efficiency

An air conditioning installation that is high in efficiency can help to cut your energy costs. It will not only cost less to run it, but it will also protect your air conditioner from overworking and needing expensive repairs down the road.

In general, the higher the SEER rating of your air conditioning system, the more efficient it will be. However, other things can be done to improve the efficiency of your home’s air conditioning. For example, sealing any leaks in your house is essential. This will prevent cooled air from exiting your home and instead be going to the outside.

Another way to increase your home’s energy efficiency is to install ceiling fans. These fans move the air around your home more efficiently than a central air conditioner. They use far less electricity, and they can be positioned to rotate counterclockwise during the summer when the cooling system is running.

Other steps that can be taken to improve the efficiency of an air conditioning system include ensuring that it is properly sized for the building and reducing its electrical demand through insulation, air sealing, and lighting. These measures can reduce energy consumption in buildings by 20 to 50%, and they can also save money on operating and maintenance costs.

Moreover, reducing energy use through these strategies can significantly reduce greenhouse gas emissions in the built environment (IPCC 2007). The energy savings can be further enhanced by using low-energy lighting and appliances, and by replacing older air conditioning systems with more efficient ones.

While installing an efficient air conditioning system can be an investment upfront, it can quickly pay off in lower utility bills. In addition, an efficient system will last longer and require fewer repairs, saving you even more in the long run.

It is important to note that you may be eligible for rebates and incentives when purchasing an energy-efficient air conditioning unit. Your local HVAC professionals should be well-versed in these types of programs, and they can provide you with the information you need to take advantage of them.

Location

The location of your air conditioning installation is vital to ensure that it performs as efficiently as possible. If you choose to have your air conditioner placed in a shaded area, then it will need to work less hard and will consume lower energy amounts. The unit should also be away from heat and vapor sources. This will help reduce the cooling costs and extend the lifespan of the unit.

The ideal location for an outdoor unit is on the north or east side of your house so that it shades it from the sun during the hottest part of the day. The unit should be situated on a solid concrete slab to minimize vibration and noise. It should be kept away from dirt, debris, or bushes which may interfere with its performance and maintenance.

A good HVAC company will provide you with photos accompanied by bios of the team that will be doing the work ahead of time so that you can familiarise yourself with them before they arrive. This will provide you with a sense of security and confidence that you are hiring reputable professionals.

In the case of a domestic split system, a line set will need to be run between the indoor and outdoor units. This can be installed either under or overground and will require a hole to be drilled through the wall of your house for the line set to enter the property. If your air conditioning installation requires a line set, make sure it is not located near antennas, power lines, television or radio systems, intercoms, or telephone connections as these can cause electrical interference.

Air conditioners must be kept clear of leaves and twigs which will clog the fan and prevent the unit from producing cool air. If you live near deciduous trees, check them regularly to remove fallen branches and leaves. Similarly, check if the guttering nearby is causing any issues with the drainage of the condensed water. If it does, consider extending the guttering to avoid any problems in the future. In addition to this, the area around the outdoor unit must be free of any obstructions preventing it from breathing. This includes a space of 2-3 feet all around the unit and shouldn’t be blocked by anything that could impede its operation, such as shrubs or furniture.

Budget

If your existing AC system is more than 10 years old, it may be time to upgrade to a newer model. While the initial investment can be costly, the savings you’ll see on your energy bills are well worth it. If you can find a company that offers low-interest financing, the costs will be even lower.

When shopping for a new air conditioning system, be sure to ask your HVAC contractor what size unit is appropriate for your home. They can perform an in-home evaluation to determine the size of your living space and any existing equipment you may have. They can also tell you if you need a zoned cooling system and help you select the right equipment for your needs.

Another important factor to consider is efficiency. All new AC units must meet a minimum SEER rating of 13. Higher-rated systems use less electricity to operate, which can save you money over the long term.

Ductwork is also a major factor in the cost of an AC installation. A new system can cost up to $10,000 if you need to install ductwork in your house, depending on the size and condition of your existing ducts.

If your ductwork is in good shape, the cost of an AC installation will be much lower than that for a home without any existing ducts. However, if your ducts are damaged or have leaks, you will need to pay for additional insulation and ductwork.

Choosing an experienced, reliable contractor is essential for an affordable air conditioning installation. Avoid companies that give estimates over the phone without taking measurements and inspecting your current equipment. You want to make sure you’re getting the best value and quality for your money, especially since an AC system is such a large investment.

Lastly, check with your local utility company to see what rebates are available. ENERGY STAR rebates can significantly offset the cost of an air conditioner. Additionally, many states offer tax credits for installing high-efficiency systems. These incentives are typically limited in duration, so it’s best to act quickly.

What You Need to Know About TV Mounting

When mounting a TV, you need to have a few things handy: a stud finder (to mark the location of studs in the wall), a Phillips screwdriver, and a power drill. You will also need a level to make sure the TV is not crooked once mounted.

TV Mounting

Start by determining the ideal height for your TV. This will depend on the seating arrangement in the room, but you should aim for eye level. To learn more tricks on TV Mounting keep reading the article below.

The height of a TV mount is an important factor in comfort and viewing. A TV mounted too low may cause neck strain, and one that is mounted too high can create a glare on the screen that makes it difficult to watch. A general rule of thumb is to mount the TV at eye level when seated. This will provide a comfortable viewing angle without causing strain on the neck.

The recommended TV mounting height can vary depending on the size of the television and the room layout. When deciding on a mounting location, consider the seating arrangement and the average height of the viewers in the room. It is also important to keep in mind any obstacles that could obstruct the view of the TV, such as furniture, shelves, or architectural features.

Once you have a rough idea of where to mount the TV, use a stud finder to locate wall studs. A stud finder is an inexpensive tool that can help you save time and money by eliminating the guesswork involved in finding a good location for your mount. Once you have located a stud, mark its position with a piece of painters’ tape. This will prevent you from drilling into drywall and leaving useless holes in the wall.

If you plan to mount the TV above a fireplace, be sure to take into account that the heat and smoke can damage electronics. The bottom of the television should be positioned at least two inches above the top of the fireplace mantel.

To determine an optimal TV mounting height, sit on the furniture you normally use to watch TV and get a feel for how high you can comfortably place the screen. Alternatively, you can measure the distance from your eyes to the center of the TV screen using a strip of low-stick painter’s tape. The point at which the tape intersects with the vertical and horizontal corners of the screen is the center of the TV.

Aesthetics

The TV mount will be an integral part of your living space, so you should choose one that is visually appealing. Fortunately, there are several options to consider.

A fixed wall mount sits flush with the wall, eliminating the need for a bulky TV stand and creating a clean and sleek look. This option is great for small rooms or if you want to conceal the mount behind furniture. You can also choose a full-motion mount, which allows you to tilt the TV up and down to reduce glare or fit in corners. These mounts are a bit more visible than fixed mounts, but you can hide them behind your furniture to keep the room looking tidy.

An articulating arm mount is another option that provides unmatched flexibility. These mounts allow you to swivel the TV, which can be beneficial for conference room settings where multiple people will be viewing the screen from different positions. You can also choose a mount with a gas spring arm, which makes movement smooth and easy.

Another way to improve the aesthetics of your TV is by installing a recessed mount in the wall. This type of mount can be painted to match the wall, which will create a seamless look. You can also choose a frame mount, which will hold your TV like a piece of artwork and blend seamlessly into your decor. This type of mount is available in a variety of finishes, including wood and marble effects.

Before you decide on a TV mount, it is important to experiment with the height of the TV and your seating arrangement to find the ideal position. It is recommended that you mount the TV between 42 and 60 inches off the floor to ensure a comfortable viewing experience. A good way to determine the best mounting height is by using a stud finder or other means to locate studs and mark their location on the wall. Using a stud finder will help you avoid drilling into electrical or plumbing pipes and make your project easier. You should also consider purchasing cable management solutions, such as cable clips or raceways, to hide unsightly cables and maintain a clean and organized appearance.

Cable Management

A TV mount frees up space on a console or media cabinet, making it easier to access the ports at the back of your TV and to add other equipment like a set-top box or gaming system. It also allows you to reposition your TV for a better viewing angle without having to move furniture or rearrange wiring. This is especially beneficial for homes with children, as it prevents them from reaching over the TV to play with or touch it, which could cause damage or a dangerous fall.

When choosing a mount, make sure it is rated for the weight of your television and has enough stability to hold it when in use. Look for a mount made from materials that can withstand impacts and rough handling, such as steel or aluminum, to ensure it won’t come loose over time. Check the UL listing to verify that it meets stringent safety standards.

Most VESA-compatible mounts have a plate that attaches to the back of your TV and arms that fit into the holes in a wall or other mounting surface. Some may require some light drilling to create these holes, but the overall installation process should be simple and straightforward.

Once your TV is mounted, it can be a great way to showcase art or other decor on the wall and create a more cohesive aesthetic for your home entertainment setup. However, the dangling cords can be distracting and mar an otherwise clean look, so consider installing a cable management kit to help conceal them. These kits include a plastic track that mounts to the wall over wires and a dual electric motor that flips your TV up when it is not in use, protecting it from damage while adding an elegant, minimalist look to your room.

One drawback of a TV mount is that it can be difficult to remove the mount from the wall, requiring some strength and assistance. This may be a problem in older buildings with plaster walls or, in some cases, in homes with wood paneling. Fortunately, there are many DIY solutions to this issue, such as using a tool that combines a drill and a power saw for a quick and easy installation.

Weight

With TVs getting slimmer and lighter, mounting them to the wall is an increasingly popular way to declutter and make a room feel bigger. While it might seem like a difficult project to undertake yourself, with some basic tools, a suitable mount, and a friend to help lift the television, it’s actually not that hard. The key is to think about where you want to hang the TV, the type of mount you need (fixed or articulating), the VESA pattern, and the weight and size of the TV itself.

Most TV wall mounts are designed to be used on drywall and come with all the hardware needed to attach them to the wall. To ensure that the wall can support the weight of the TV and mount, it’s important to use a stud finder to locate studs in the wall before drilling holes for the anchor points. A stud is a vertical piece of wood that makes up the structural frame of your wall. It’s much stronger than drywall and can support much more weight.

A stud is the best place to attach an anchor point, but if you don’t have access to a stud in your wall, there are other options. Some TV wall mounts come with a mounting plate that can be screwed into the wall, which provides several more anchor points to help ensure the wall can support the weight of the TV.

When choosing a mount for your TV, always check the VESA pattern on the back of the TV and the maximum weight rating of the mount to make sure they are compatible. This information should be listed on the packaging or in the TV’s manual. If it’s not available, you can often find the specifications for a specific model of TV on the manufacturer’s website.

A faulty mount or improper installation can lead to a very expensive mistake. If you’re unsure about how to properly mount your TV, it’s best to leave the job to professionals who can provide expert advice and ensure your walls are ready to support your new flatscreen.