The roof protects your home against snow, rain, and sunlight. It can take a beating, but regular inspections and maintenance will help it hold up well.
Look for missing shingles and other signs of damage. You should also check flashing around chimneys and dormers, as well as skylights and vent pipes. Contact Roof Repair NJ for professional help.
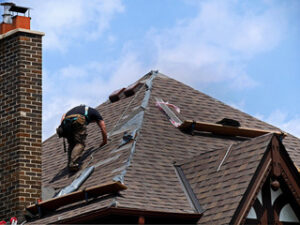
A damaged roof shingle isn’t just unsightly; it can let water into your home, leading to mold and rot. That’s why it’s important to make sure to do whatever you can to keep your shingles in good shape. But before you grab your ladder and start fixing those pesky shingles, know that there are some cases when it’s best to leave it to the professionals.
First, determine how severe the damage is. Depending on the extent of the problem, a simple touch-up could be enough to keep the leaks at bay. But if the shingle is punctured or ripped, it’s probably time to replace it.
To repair a shingle, you’ll need a pry bar, hammer, utility knife and a handful of 11/4-in. roofing nails. You’ll also need a replacement shingle for reference and some shingle granules to camouflage the repaired spot. Once you’ve gathered your tools, locate the damaged shingle on your roof and carefully climb up to it. Then, slide the pry bar beneath the shingle directly above it and slowly lift to break the sealer strip and expose the nail heads below. Continue pulling up shingles until you’ve removed a row above the damaged one.
Once the damaged shingle is removed, carefully install the new shingle in its place. Make sure to press down firmly on the tabs and apply a thick bead of roof cement under each. Then, press down again until the shingle is secure.
It’s a good idea to reseal the ridge caps of your roof as well. This prevents water from leaking into the attic and causing further damage to your roof materials.
A faulty ridge cap isn’t always easy to detect until it’s too late. That’s why it’s important that you perform regular roof inspections. It’s an ounce of prevention that can save you a lot of trouble down the road. It’s also an easy way to keep your roof looking like new and protect your home from damage.
Flashing
Flashing is a strip of impervious material installed around protrusions in walls and roofs to prevent water penetration into the building materials. It’s especially important to have properly-installed flashing around chimneys, dormers, vent pipes and skylights.
Flashing may be metal or non-metal, depending on the situation. It can be exposed or concealed, and it can be in a wide range of shapes, sizes and styles. In general, flashing works by collecting pooled water and directing it away from the area where the flashing is located.
Most flashing is installed to protect points of interruption in wall or roof planes, or areas where a sloped surface meets another perpendicular surface like a chimney or dormer. These are the places where a lot of leaks are caused by improper flashing installation, which is why it’s important to have these areas looked at and repaired periodically by a professional.
There are several different types of flashing, and the type that’s used is based on the type of roof or structure where it is being installed. Roof flashing is usually made from a malleable metal such as aluminum, which is cheap and easy to work with. It’s also available in a wide variety of colors to match most roofing materials.
Typical roof flashing includes step and continuous flashing, which are most often used around chimneys or dormers, and drip edge flashing, which is installed above windows or doors. Other flashing shapes include channel or U-shaped flashing, which is used where the edge of a tile roof meets a wall, and counter flashing, which is often installed to complement step flashing around chimneys and dormers.
The various flashing types are typically installed with caulking, which helps keep them waterproof. It’s recommended to replace caulking regularly, especially in coastal environments. If the flashing isn’t replaced, rust can eventually cause it to fail.
Fascia Board
The fascia board is the long wooden plank that sits behind your gutter system on your roof’s eave. It connects to the roof rafters, closes off the attic and mounts your gutters. Clogged gutters, roof leaks and other roofing problems may leave your fascia exposed to moisture continuously which can damage it. Moisture damage includes wood rot, mold, fungus and black stains from algae. If any of these conditions are present, they should be repaired immediately to prevent further damage and potential water damage to your home.
If your fascia boards are rotting, it is essential to remove the damaged sections and replace them with new boards as soon as possible. The longer you wait, the more damage the rot will cause to the rest of your roof’s eave and the guttering. In addition, a rotting fascia board can give way under the weight of your gutters and cause them to fall off or detach from your house altogether.
To repair your fascia, you will need to have a number of tools including lumber, a hammer, a chisel, a circular saw and safety glasses. The safety glasses are important to ensure that you do not get splinters in your eyes as you remove the old boards. Also, a nail gun will be required to fasten the new boards in place. A good quality sealant is also needed to keep the water out of your home.
When choosing a new material for your fascia, consider your climate, budget and roof type. Some good options are cedar, redwood and spruce because they tend to resist moisture more than other types of wood. If you are unsure of which type of wood will work best for your home, talk to a local roofer who can provide you with advice about the best option.
If you decide to do the work yourself, it is recommended that you read the instructions carefully and use a power tool like a reciprocating or a circular saw. It is also a good idea to make sure that your tool is sharp before starting the job. Also, measure the existing boards so that you know what length to cut the new ones. You may want to miter the ends of your boards at a 45-degree angle, which will make them look more professional.
Roof Leaks
When your roof leaks, it can wreak havoc on your ceilings and the contents of your home. It makes brown stains on your attic and ceilings, it damages insulation, it causes mold, and it can even cause the plaster in your house to bubble and expand. It also affects the temperature of your attic, which in turn effects the rest of your house. If you’re dealing with a roof leak, it’s important to limit the damage as much as possible by moving what can be moved and covering items with tarps or buckets.
If you have access to your attic, the easiest way to track down a roof leak is to go up there with a flashlight and look for water spots or stains on the ceiling. Then, trace where they’re originating to see where the water is coming from in your roof. Most of the time, leaks are caused by things that penetrate your roof, such as plumbing and vents, chimneys, dormers, and anything else that sticks out through the roof surface. Look uphill from where the leaks are originating and you’ll usually find where the penetration is entering your roof.
Leaks can sometimes be difficult to track down because the point where you can see the water leaking isn’t necessarily close to where the leak originated in your roof. This is because water travels downhill and can run through rafters, sheathing, and even the ceiling until it finds a hole or crack in which to drip.
If the area where you’re seeing the leak is too large to be covered with a bucket or tarp, then it might be a good idea to enlist the help of a friend and try a water test. Have one person outside the house with a hose and someone inside to watch for drops. Run the hose around different areas of the roof, starting low and working your way uphill. Be sure to soak all of the shingles and flashing in the area.
Another common source of roof leaks is from pipe boots, which are made of neoprene and can be prone to cracking over time. They’re typically located above a bathroom or closet, so if they start failing, it will often show up in that room in the ceiling. If this happens, you can puncture the bulging spot on the ceiling with a screwdriver and let the water out. This will prevent the water from collecting and causing further damage.